How to Add a Crypto On-Ramp to Your Product: Widget, SDK, or API

- A widget is the fastest way to add buying and selling. You can go live in under 48 hours. Paybis runs the screen your users see and handles the payment and identity steps behind it.
- A web SDK or a React Native SDK keeps the buy flow inside your own product, on web or in a mobile app.
- The API and white-label options give you control of every screen and your own branding, with the most engineering work.
- Across all of them, Paybis holds the MiCA CASP and Payment Institution licences, and Paybis covers chargeback liability.
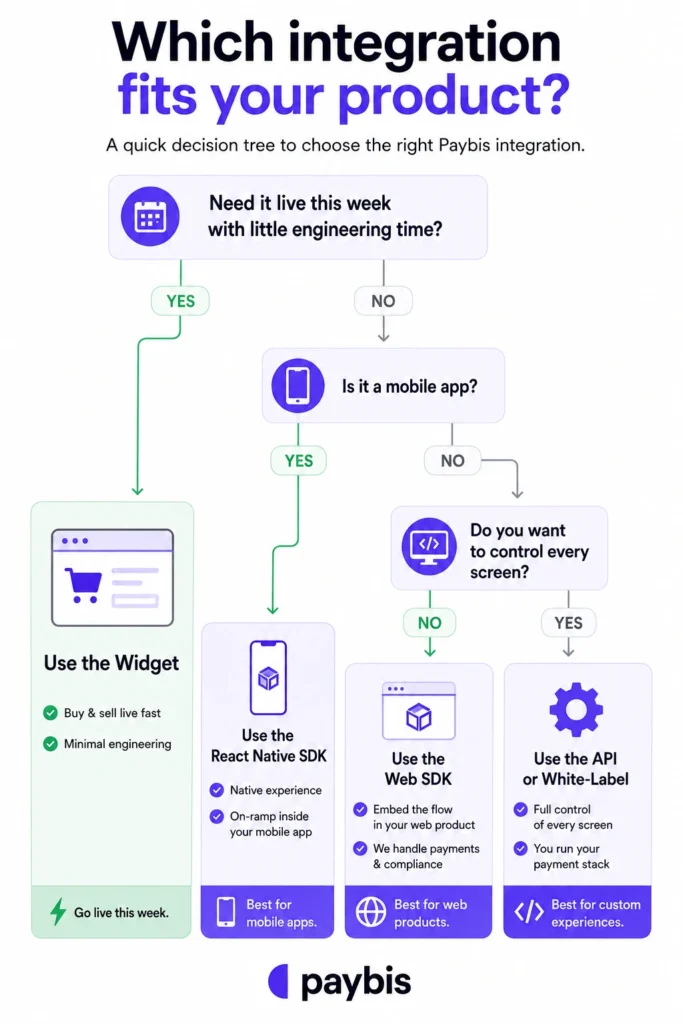
Pick a widget when you want to launch quickly with little engineering time. Pick a web or React Native SDK when the buy flow needs to sit inside your product. Pick the API or white-label when you want control of every screen and you already run your own payment setup. Teams that need something live this week usually start with the widget and go deeper later.
Your wallet, exchange, or app needs a way for users to buy crypto with a card or a bank transfer, and often a way to sell back to cash. The open question is how to connect that flow to your product. There are four ways to do it with Paybis. They differ in build time, how much of the interface you control, where card data sits, and who runs the checks behind the payment. This guide covers each one and says which fits which kind of product.
New to on-ramps? Start with our guide to how the Paybis On/Off-Ramp works. Ready to build now? See the Paybis On/Off-Ramp for business.
The four ways to integrate, at a glance
| Method | Build effort | UX control | Time to go live |
|---|---|---|---|
| Widget | Low | Low, set by theme and URL settings | Under 48 hours |
| Web SDK | Medium | Medium | A few days |
| React Native SDK | Medium | Medium | A few days |
| API | High | Full | Several weeks |
| White-label | High | Full | Several weeks |
The widget
The widget is a ready-made screen you add to your site or app. You embed it with a few lines of code, or open it as a hosted page. Paybis runs the interface and handles the payment and the identity checks. You can set colours and pass in details like the wallet address and the amount. You can be live in under 48 hours.
Pick the widget when you want buying and selling working fast and you would rather not build payment screens yourself.
The web SDK
The web SDK puts the buy flow inside your own web app. Your users stay on your pages, and the checkout looks like part of your product. You get more say over the layout than the widget gives you, and Paybis still handles the payment and the identity checks.
Pick the web SDK when the buying flow should match the rest of your site.
The React Native SDK
The React Native SDK does the same job for mobile apps. Paybis shipped it in 2026, so you can add buying and selling to an iOS or Android app built in React Native without wrapping a web page. Your users buy inside the app and never get sent out to a browser.
Pick the React Native SDK when you ship a mobile app and want the on-ramp to feel native.
The API
The API gives you the raw endpoints. You build every screen and the logic behind it, then call Paybis server to server. You get full control of the experience and the data. It takes the most engineering work. If you capture card details on your own screens, your company takes on PCI responsibility for that data.
Pick the API when you need control of every screen and you already run payment infrastructure.
White-label
White-label puts your brand on the full Paybis flow. Your users see your name while Paybis runs the payment and compliance rails underneath.
Pick white-label when you want a product that looks like your own without building the payment stack yourself.
| Method | Card data / PCI scope | Who runs KYC |
|---|---|---|
| Widget | Stays with Paybis | Paybis |
| Web SDK | Stays with Paybis | Paybis, under its licence |
| React Native SDK | Stays with Paybis | Paybis, under its licence |
| API | Falls to you if you capture cards yourself | Paybis verifies, you pass the user in |
| White-label | Depends on setup | Paybis, under its licence |
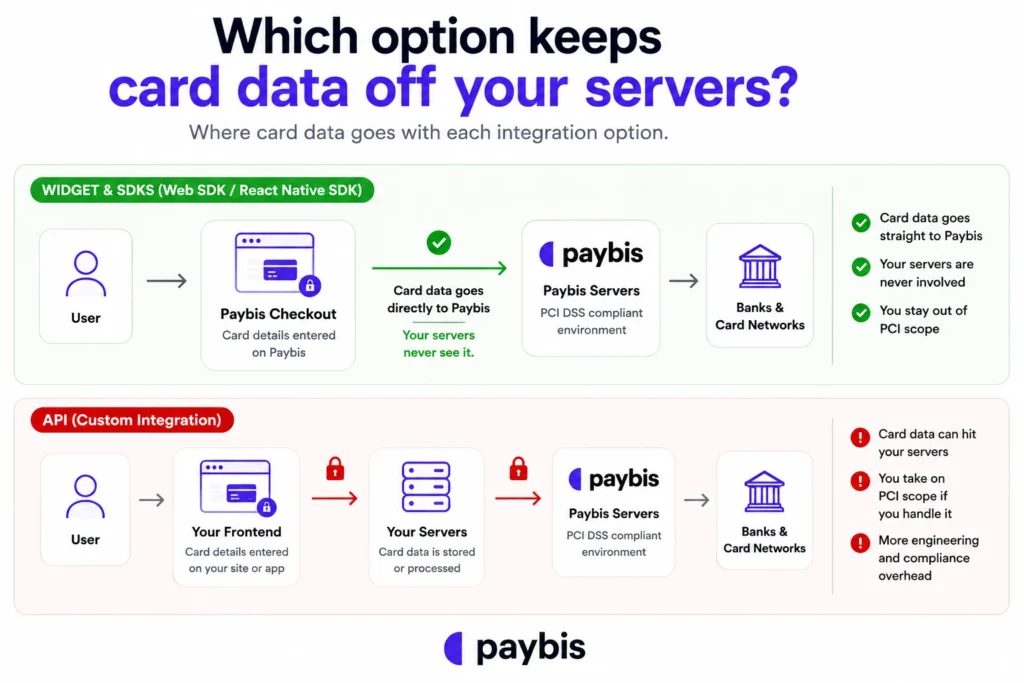
Which option keeps card data off your servers?
When a user pays with a card, someone has to handle that card data under the PCI DSS rules. If card data reaches your servers, your company falls inside PCI scope and has to meet those rules, which means audits and ongoing work.
With the widget and the SDKs, the card step runs on the Paybis side, so card data never reaches your servers. With the API, it depends on how you build it. If you capture card details yourself, you take on PCI scope for that data. If keeping card data off your systems matters, the widget or an SDK is the simpler path.
Who is licensed, and who covers chargebacks?
Two things sit behind every on-ramp and often get missed when teams compare options.
The first is licensing. Paybis holds a MiCA CASP licence and a Payment Institution licence in the EU. The regulated parts of buying and selling crypto run under those licences, not yours, whichever method you pick. You do not have to hold a crypto licence to offer the service.
The second is chargeback liability. When a card payment is disputed, someone covers the cost. Paybis covers it, so a disputed card payment does not land on your books.
Users can also buy up to $1,000 a year without a full identity check, which lifts approval rates on smaller first purchases. Paybis supports more than 25 payment methods and over 54 fiat currencies across more than 180 countries.
Which integration fits your product?
Match the method to what you are building:
- You want buying and selling live this week with little engineering time. Use the widget.
- You run a mobile app and want the on-ramp inside it. Use the React Native SDK.
- You want the flow inside your web product but would rather not build payments. Use the web SDK.
- You need control of every screen and you run your own payment stack. Use the API or white-label.
Most teams start with the widget. It puts a working flow in front of users fastest, and you can move to an SDK or the API later once you know what you want to change.
Ready to add buying and selling to your product? See the Paybis On/Off-Ramp for business.
FAQ
What is the difference between an on-ramp widget, SDK, and API?
A widget is a ready-made screen you embed and Paybis runs. An SDK puts the buy flow inside your own web or mobile app while Paybis still handles the payment and the identity checks. The API gives you the raw endpoints so you build every screen yourself. The widget is fastest to add. The API gives the most control.
Which on-ramp integration is fastest to launch?
The widget. You can have buying and selling working in under 48 hours, because Paybis provides the interface and runs the payment and identity steps.
Can I add a crypto on-ramp to a mobile app?
Yes. The React Native SDK adds buying and selling inside an iOS or Android app built in React Native, so users stay in your app.
Do I have to handle KYC and compliance myself?
No. Identity checks run under Paybis’ MiCA CASP and Payment Institution licences, whichever integration method you use.
Which option keeps card data off my servers?
The widget and the SDKs, because the card step runs on the Paybis side. With the API it depends on how you build it. If you capture card details yourself, you take on PCI responsibility for that data.
Can I start with the widget and move to the API later?
Yes. Many teams launch with the widget and switch to an SDK or the API once they know what they want to customise.
Disclaimer: Don’t invest unless you’re prepared to lose all the money you invest. This is a high‑risk investment and you should not expect to be protected if something goes wrong. Take 2 mins to learn more at: https://go.payb.is/FCA-Info